Friday 29 May 2015

Butterfly Challenge - D for Doily

Good afternoon friends, followers and fellow bloggers, the card I am sharing today is for a challenge over on Butterfly Challenge blog which is D for doily.


I used my free doily embossing folder which came with Quick Cards Made Easy magazine and some black and white card from my stash. The butterflies came from Hobby craft and the sentiment was another magazine freebie (sorry can't remember which one).
Thank you so much for dropping by my blog and if you do leave any comments,  a massive thank you for that too.
Hugs Lainie xx

Thursday 28 May 2015

40th birthday card

Good morning friends, followers and fellow bloggers, weather is a bit uncertain here today,  we have sunshine but with some threatening looking clouds rolling in.
I hope you all had a lovely restful bank holiday and yay its almost the weekend again.

So, today's card that I am sharing with you is one that I was asked to make for a neighbour, who I have only just got to know, despite living opposite eachother for the past 5 years!!!! It's thanks to a new neighbour and facebook that we have finally got to speak to one another,  ironic isn't it? 
The request was a card for her sister in laws' 40th birthday with a white horse and dog.   So here is what I came up with


The images and papers were free in Making Cards magazine, the paper flowers were from The Works and so was the die cut numbers. Everything else was from my stash.
I hope you like this card and I would like to thank you for dropping by.
Hugs Lainie xx

Thursday 21 May 2015

78th birthday makes

Good morning friends and fellow bloggers, I hope the sun is shining wherever you are today.  We,  it is here at the moment but don't think it will last 😦.
I would like to share with you today my creations for my Slimming World friend who will be celebrating her 78th birthday on Sunday.  She has invited all her SW friends for a meal at a local pub and asked me to make 15 dragonfly brooches for her guests.

I have made 10 so far as they take time and my hands can only withstand so much hot glue lol.

She loves the colour pink and requested pink and lilac dragonflies.

I decided to make a pop up box card for her in pink of course, I just hope she likes it.

Thank you for visiting my blog and if you do have time to comment, a massive thank you for that too.
Hugs Lainie xc

Tuesday 19 May 2015

Moonlit Romance

Goid afternoon friends, followers and fellow bloggers, my isn't it cold? Well it is here in the South any way.  I hope you are all having a good week.  I gave my new neighbours a New Home card last week and the husband caught my attention yesterday to ask me where I'd bought it, as it was so lovel.  He could not believe that I had made it and has now placed an order for 2 birthday and 2 thank you cards, what a nice chap.  He has also been on to my Facebook page and recommended me to his friends, so I may be busy over the coming months.
Any way enough of my twitterings.   The card I am sharing with you today is one that I made for my Slimming World friend to give to her daughter who gets married in October on the beach (In this country would you believe? ???),  I already had this image which I'd purchased from Craftsuprint some time ago which I thought would be perfect. My friend was over the moon with it. Happy days 😊


Thank you for visiting my blog and if you do have time to comment or choose to follow me, a big thank you for that too and do let me know so that I can return the favour.  Hugs for now. Lainie xx

Thursday 14 May 2015

Melted wax crayon technique

Good morning friends, followers and fellow bloggers, I hope your week is going well. I am taking it easy today as I had a harrowing journey into South London yesterday to see a customer. I left home at 9. 15 am and arrived at 11.30, this journey should have only taken an hour tops! The traffic was dreadful and most of that time I was at a standstill and the cause of the hold up was temporary traffic lights. It didh't help that I was unfamiliar with the route either. Needless to say I was late for my appointment but then again my customer had been caught in the traffic too and had only arrived minutes before me phew!!
Anyhoo, enough of my ramblings. Today I woukd like to share another natty little technique I learned on YouTube ( I really do watch too much on there) and it is so simple. All you need is some wax crayons and a coffee mug warmer ( I purchased mine from eBay very cheaply)

I first cut a circle to fit in the top of my mug warmer and the stamped my image.
Then I heated up the mug warmer, laid my image on top and coloured with wax crayons. The warmth from the mug warmer melts the crayons enough to colour smoothly and evenly, they will also blend easier. The warmer I have does not turn the wax to liquid as does the one in the youtube video, which gets so much hotter than mine but at least I don't risk burning myself.
To complete my image, I wiped a Versa mark ink pad over it and then heat embossed it with clear embossing powder. The colours really popped.

I hope you like this technique and maybe have a go yourself.  Thanks for visiting and if you do leave any comments I am really grateful. If you have any questions please be sure to ask.
Hugs for now.
Lainie xx

Tuesday 12 May 2015

Quick and simple pen/scissor/ruler etc holder

Good morning, friends, followers and fellow bloggers. Well it's not as warm here today as it was yesterday and ghere's no sun 😔.
The project I would like to share with you is one that I saw on Pinterest,  which inspired me to have a go myself.

It's a very quick and simple storage solution for my scissors and rulers, as they just either got in the way or fell out of my other containerts which I have on my craft workspace. I hate rummaging in drawers for things and like to have everything close to hand. 
So, this is so simple and so perfect, plus it has been stuck to the side of my shelf unit, so is out of the way too. Happy days! 😀

So here's what you do

First remove any labels and cut your plastic container (either shampoo or bubble bath, lotion etc) to the height required. I cut about a third off the top of mine.

Second, smooth the rough edges by placing the top of your bottle against the bottom of a hot iron, this makes them nice and flat and smooth. Please be careful not to melt it though.

Third, decorate any way you choose.  I found these adhesive butterflies worked well for me.

Finally, attach large sticky foam pads to the pack and your pot is ready to go.

If you don't want to stick your pot to a wall or cupboard etc. then you will probably have to weight the bottom to stop it tipping over.

I hope you like this simple and very inexpensive or should I say free? project.

Thank you for visiting and if you do leave a commen,  many thanks for that too.
Hugs Lainie xx

Monday 11 May 2015

First attempt at book folding and other makes

I thought I would just do another cheeky post and share the makes from yesterday's workshop.

This is my first attempt at book folding


 These backgrounds were created using Distress ink pads and a water spritzer. The stamp at the bottom is a Honey Doo one. I am not sure of the sentiment. We used fine line markers on the top ones to draw around the shapes that the ink had formed. They look like mini atlases, perfect for a bon voyage card.

 This was a Honey Doo stamp  on vellum which was then embossed with Silver Pearl embossing powder. I coloured the second image on the reverse with a Promarker.

I hope you are inspired by these techniques, I certainly am and will be using them a fair bit in the future.

Thank you for taking the time to visit.
Hugs Lainie xx

Sunday 10 May 2015

Dutch Barn Card

Good morning friends, followers and fellow bloggers. I hope you had a lovely weekend.  I spent a very enjoyable day at a craft workshop run by the lovely Paul Church one of the designers from Create and Craft TV. I shall post some photos of the projects when I've taken them lol.
However, the card I am sharing with today is a Dutch Barn Card which I learned to make at my local craft workshop some time ago and decided to make another. I hope you like it and perhaps are inspired to make one too.

This is the front of the card
 When you lift the front flap it reveals a message

 When you open the doors it re feasible the rest of the message

 This photo shows that its on an ordinary card blank


Thank you for taking time out to visit today and if you leave any comments, I want you to know these are greatly appreciated.  If you wish to follow me then please let me know so that I can return the favour.
Hugs Lainie xx


Friday 8 May 2015

Step by Step Flip-It card

Good afternoon friends, followers and fellow bloggers, I do hope you have had a good week. It has flown by for me without actually achieving anything really. So I thought best that I do what I intended to do and that is post a step by step tutorial on my Flip-it card. So here it is:

1. First take a sheet of card and fold in half


2. Choose the die and place it on the front of your folded card close to the centre


3. Score  above the die from the top of the card but only as far as the die


4. Do the same at the bottom. DO NOT SCORE THROUGH THE CENTRE OF THE DIE


5. Attach the die to the card front with low tack tape, as you don't want it to shift when you run it through your die cutting machine


6. Place it Face Down on your cutting plate and line up the score line with the edge of the cutting plate


6. Lay the base plate on top in the same position, so that some of the card is poking out


8. Run it through your die cutting machine


9. Remove the die


10. Fold the front back on itself at the score line and bone fold


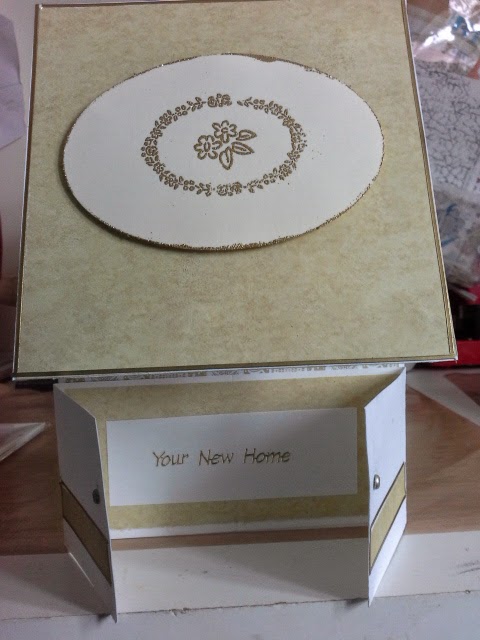
11. Your card is now ready to decorate


For my card I covered the inside and front panel with patterned paper and then die cut smaller shapes and attached to the front and back of the flip-it and one inside for the sentiment


I added ribbon and a bow to the folded edge


And finally added some spiral roses, flowers and flourish, plus a sentiment on the flip-it.


I really hope you find this little tutorial useful. If you have any questions please just ask, I will do my best to answer them.
Hugs and thank you for visiting. If you choose to follow, then please be sure to let me know so I can visit your blog too.
Lainie xx

Tuesday 5 May 2015

Grandaughter's creation

Good morning from an overcast and windy Kent, hope the weather is better where you are.
I would like to share a card with you that my 10 year old grandaughter made for her brother, his birthday is at the end of the month. She loves to craft with me and makes all her own cards and sometimes the gifts too. I very rarely have to help her these days as she is very adept with a paper cutter, die cutting machine, rubber stamps and now a glue gun 😲 lol.

She also made her own flower hair clippie but I didn't get to photograph that ......bad Grandma lol.

Thank you for visiting my blog and if you do leave a comment or follow my blog then a humungous thank you for that too. Hugs Lainie xx

Sunday 3 May 2015

This weekend's makes

Good afternoon to my lovely friends and fellow bloggers. Well this weather is awful, I am cold and it's raining. I really wanted to do some gardening too as I have my gorgeous 10 year old grandaughter staying this weekend and she loves to help. Oh well looks like I'll have to do it on my Todd next week, weather permitting.
I hope you are all well and making the most of this long weekend.
I am sharing with you today the projects created over the past couple of days. My grandaughter loves to craft too so we were both beavering away in my craft room, such fun.
This is a new home card created using a sheet from Craftsuprint

I used a shadow Stamping technique on this card with the free stamps from Papercraft Essentials


I created a faux letter background on this card


This card is for the Little Rascal's challenge over on Docrafts


I attempted to create a Northern Lights effect on this one.......not sure though😞

This is another.....yes sorry.....dragonfly hair clippie which I made for my grandaughter.

Thank you for visiting my blog and I hope you'll come back soon.
Hugs Lainie xx