Wednesday, 21 October 2015

Watercolour Christmas Cards oh and a few more cross stitch ones.

Good day friends, followers and visitors to my blog on this very damp and murky morning. I hope you are all well.  My friend and I have been busy with orders which we are very happy about and I would like to share some of them with you. But first I would like to share a couple of watercoloured cards I did just for a change.

I was inspired to paint these by a tutorial on YouTube by Patrick Ley-Graves,  a very talented artist. He makes you realise that painting isn't as difficult as you imagine.

The next selection are special orders which our customers are really pleased with.

These 2 bottle covers have been requested by our Slimming World Consultant as prizes for our Miss Slinky and Mr Sleek competition to be held next week.


 The Rocker baby card was requested after seeing the one we posted on our Facebook page.

We have also been preparing for another handmade Christmas fair to be held on 13th November, so busy busy busy but we are having such fun coming up with different ideas.  
Thank you for hopping by today and I do hope you like the items I am sharing.  If you choose to follow my blog please let me know so that I can return the favour.
Hugs for now Lainie xx

Wednesday, 14 October 2015

Last of the special order cross stitched cards

Good morning friends, followers and visitors to my blog, I hope you are all well. It's a wet and miserable day here so I aim to make a few more cards for the 'Open House' that my Slimming World consultant is holding tomorrow.  Every year she holds one or two in which she has a items from various traders available for sale throughout the day from 9am to 9pm.  My friend and I have been invited along to sell our projects, quite exciting really.  However, the past couple of days we have been beavering away to get our special orders completed. So today I would like to share with you the final 3 orders.

The first one was ordered for a Stepdad who likes birdwatching. This was a very simple card to create, just cut an aperture to house the cross stitch and added die cut 'birds on a wire'


The pop up box card features a beaded snowflake on the front flap in gorgeous black AB beads.  The snowflakes popping out of the box are metallic pearlised white card and I used snowfall acetate to attach them to the base.


The bauble in this last card hangs from the centre of the card. I cut an 8" × 8" cardblank and then die cut an aperture in the front.  I created a bauble 'frame' to house the cross stitch and then attached some plastic bobble cord so that it could be hung inside the aperture.  The snowflakes on the front of the card are die cuts.


I hope you like seeing these cross stitched designs which we have thoroughly enjoyed making. I also hope that you may be inspired to get together with a creative friend and make some joint different projects.
Thank you for visiting today, do let me know so that I can return the favour.

Hugs for now
Lainie xx

More Cross stitch creations

Good morning friends, followers and visitors to my blog. I am still trying to get through the orders for the cross stitch creations.  So today I am sharing with you 2 of the orders I completed yesterday.
The first is a personalised Christmas card. I cut an 18cm square card base and die cut an aperture in which I adhered the cross stitch panel. I then die cut the corners, which was a free die in a magazine and attached them for added decoration. To match the iridescent aida (which you can't really see in the photo) I added a touch of clear Wink of Stella.  The customer loves it.


This second creation is a personalised bookmark which was a real challenge to do.  To begin with I could not get the aperture to go right, considering I had to do this by hand as I don't have a suitably sized die. So after wasting reams of card stock,  I finally gave up and decided to hide the mistakes with a border. Seems to have worked ok.  This one was also loved by the customer.  Phew 2 happy bunnies, 3 including me lol.


I have 2 more orders on the go at the moment plus 2 waiting to be started, so busy, busy, busy me today.   
I hope you all have a lovely day and I would like to thank you for taking the time to visit my blog today.

Hugs Lainie xx


Sunday, 11 October 2015

Cross stitched creations

Hello again to all my friends, followers and visitors, I know it's a long time since I last posted a blog but have been suffering with stress and have been very busy. I hope you are all well and although I have not posted myself, I have taken a look at some of your a recent blogs.  Today I would like to share with you some of the projects that I have created with my cross stitiching friend.  We have our own page on facebook www.facebook.com/lainairecreations if you would like to take a look at our other creations.
Christmas tags

Special order for a'Mum' card

Special order for a Golden Wedding Anniversary card

I hope you like our creations and that you visit our fb page. Thank you for visiting today and I shall share more of our creations with you soon.

Hugs Lainie x

Sunday, 26 July 2015

Envelope card

Good afternoon friends, followers and casual visitors,  today I am sharing with you a card I made at my local craft class.  I have called it an envelope card, I am not sure if this is the correct name for it but it does remind me of an envelope.  So instead of just showing you the card I decided to do a quick step by step tutorial on how to make one.
 So you will need 2 x A4 sheets of card,  patterned paper, rubber stamps, ink pad and double sided tape, as well as a paper trimmer,  Hougie board or ruler and bone folder and a corner rounder.


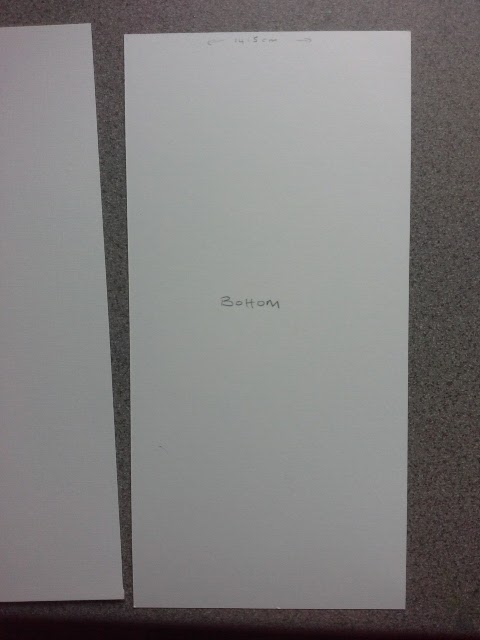
1. Cut one A4 piece of card to 14.5 cm wide and the other piece 14.7 cm wide


 2. On the 14. 5 cm piece, write the word 'bottom' somewhere in the middle


3. Score each piece at 7.5 cm,  turn and score at 7.5cm


4. Lay the 14.7 cm piece on top of the 14. 5 cm piece, as shown and check that the flaps meet on both pieces without overlapping, trim off a tiny slither if they do.  You may also need to trim a tiny piece off the 14.7 cm piece too to ensure it fits neatly.


5. Round the corners on both pieces and set aside


6. Cut the patterned paper to 14cm square


7. Stamp your chosen design around the edges. I used the 2 swirly flourishes from the free stamp set from Creative Stamping and a Happy Birthday stamp from another set but use whatever you have or leave blank


8. Attach the 14.7 cm on top of the 14.5cm piece of card as shown with double sided tape and attach patterned paper to centre


 9. Cut 4 pieces of patterned paper 6.5 cm square and stamp each piece.


10. Fold in the flaps of the base card as shown, tucking under the last flap. This will help you determine where to place your patterned pieces.


11. Once you are happy with your layout, corner round each piece adjacent to the rounded corner on the base card


 12 Your card is now complete

I hope you like this little tutorial and that you have a go at making this unusual design.  I think it makes a great masculine card and you could write a message on the inside too.
Thank you for visiting today and if you have any questions on this or any other projects,  please feel free to ask.
Hugs Lainie xx


Sunday, 19 July 2015

Dog treat jars

Good afternoon to you all. No painting today as have had to do the dreaded housework but I would like to share with you 2 dog treat jars that I made to go to my dog groomers to sell.  I made a generic one and a personalised one ( Jo my groomer's English Bull Terrier is called Albert, so did one for her to put on display as an example). These are made from empty Douwe Egberts coffee jars, adhesive vinyl die cuts, some ribbon and gems.  I decorated the lid of the generic one with heat embossed paw prints. I hope you like them.
I used a labels die and alphabet die for the front

For the back I used my XCuts dog die

Label and alphabet die on the front. Lid has photo of an English Bull Terrier (not Albert though)

Same X CUT die but different dog shaped to look like Albert.

Thank you so much for looking and for any comnents which are always very much appreciated.  Hugs Lainie xx

Saturday, 18 July 2015

Shoppers in Watercolour

Good morning, friends, followers and casual visitors,  I am sharing with you today, a little painting I did last night where I was practising painting people.


Not sure if I will have time to paint today as I have been invited by my dog groomers to make some of the dog treat jars which  they will try and sell for me, yay.  I am also going to the wedding reception of the friend who I made the invitations and bunting for, so busy, busy, busy.
I hope you have a lovely day enjoying the sunshine if you have any. So until next time........Hugs.
Lainie xx